
Introduction
A home renovation is one of the most rewarding ways to refresh your living space, enhance your property value, and tailor your home to fit your lifestyle best. However, without a clear plan, renovations can quickly become overwhelming. To ensure a smooth process from start to finish, it’s essential to adopt a methodical approach. If you’re considering a home remodel Sarasota or any large-scale renovation, this comprehensive guide will walk you through every phase needed for success.
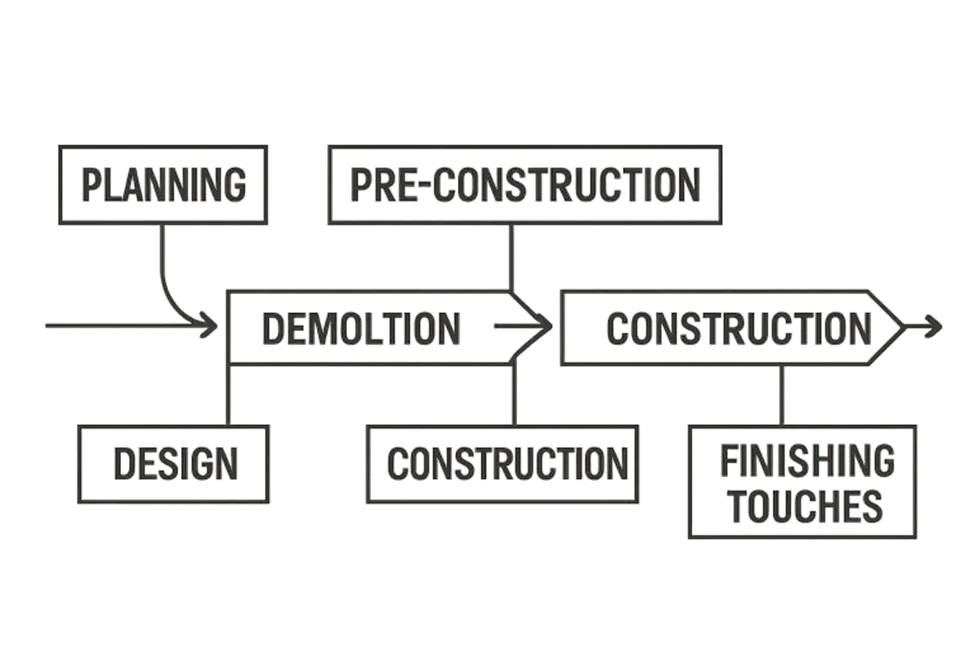
Every renovation project is unique, but most successful undertakings share a structured timeline. This roadmap will help you align expectations, prevent delays, and manage stress throughout the journey. Whether you’re renovating for aesthetics, function, or investment, the step-by-step breakdown ensures you won’t miss crucial steps along the way.
Before you begin, remember that patience and flexibility are essential, as home renovations often come with surprises—even with the best-laid plans. Let’s explore the key milestones, from conceptualization to bringing your vision to life.
Gathering information and assembling a reliable team early can make all the difference when challenges arise during the renovation. Trusting professionals, understanding your commitment, and setting realistic expectations are all starting points for an experience that will be as smooth and rewarding as possible.
Initial Planning and Research (1–2 Months)
- Define Your Goals: Identify why you’re renovating—whether it’s for a modern upgrade, added space, or increased home value. Clarity at this stage will set the tone for future decisions.
- Set a Budget: Detail your renovation budget and allocate a contingency fund, typically 10-20%, for unexpected costs. HGTV recommends reviewing finances and obtaining quotes from multiple sources to maximize your investment.
- Research and Hire Professionals: Seek out reputable contractors, architects, and designers who are well-established and have a proven track record. Explore their credentials, examine portfolios, and connect with prior clients to ensure they’re a match for your style and needs.
Design and Planning Phase (2–4 Months)
- Develop Detailed Design Plans: Work closely with your chosen professionals to finalize architectural drawings, floor plans, and visual mockups. Investing time in this phase yields greater accuracy in cost and timeline projections.
- Secure Permits and Approvals: Begin acquiring the required local permits and permissions well in advance. Some approvals can take weeks, so don’t wait until the last minute. This proactive step prevents costly future setbacks due to compliance issues.
Pre-Construction Preparations (1–2 Months)
- Order Materials: Immediately order customized and long-lead-time items to ensure timely delivery. Backorders or shipping delays can stall progress if you wait until construction starts.
- Set Up Temporary Living Arrangements: Plan for alternative accommodations, especially if renovations affect essential spaces like kitchens and bathrooms. Temporary setups keep day-to-day life manageable during disruption.
Demolition and Site Preparation (1–2 Weeks)
- Demolition: Organized and careful demolition prevents unnecessary damage and minimizes hazards. Ensure that contractors have clear instructions and that protective measures are in place.
- Site Preparation: Make required structural preparations—such as floor leveling or reinforcing walls—before building up. Addressing unforeseen structural issues uncovered during demolition now avoids major delays during construction.
Construction Phase (4–16 Weeks)
- Structural Work: Focus on major construction tasks, such as moving walls or reconfiguring layouts. These changes must always follow local building codes and standards.
- Mechanical Installations: Next, update critical systems, including electrical, plumbing, and HVAC. Licensed professionals complete and inspect this work to ensure household safety.
- Insulation and Drywall: Once all electrical and plumbing work is complete and inspected, insulate and enclose your walls. This marks the transition from rough construction to visible transformation.
Finishing Touches (2–4 Weeks)
- Painting and Flooring: Choose high-quality finishes that reflect your style and provide added durability. This phase brings your design vision to life and adds the first layers of comfort back to your home.
- Install Fixtures and Appliances: Cabinetry, lighting, countertops, and smart appliances are installed according to your detailed plans. This stage requires precision—attention to detail ensures lasting satisfaction.
Final Inspections and Walkthrough (1–2 Weeks)
- Conduct Final Inspections: Local authorities must approve the completed work to certify it meets all relevant codes. This last round of checks is vital—never skip or rush it.
- Final Walkthrough: Walk through your renovated space with your contractor, creating a punch list of any imperfections or “touch-ups” to address before signing off on completion.
Project Completion and Move-In
With everything signed off, you’re cleared to move back in and start enjoying your renewed home! Take extra care as you settle in, and keep a list of any minor issues that arise in the first few weeks to communicate with your contractor.
Final Thoughts
Renovating a home is a significant undertaking that requires organization, effective communication, and realistic expectations. By following this structured timeline, you leverage best practices favored by industry professionals and avoid many common renovation pitfalls.
Approach your home renovation with a detailed plan, mindful scheduling, and trusted experts to transform your vision into a space you’ll cherish for years to come.
Also Read-Smart Home Healing After Surgery: Tools, Tech And Gentle Support

