
We’ve all dreamed of having those gorgeous, bouncy curls that look like we just walked out of an upscale salon. You know the frustration: curls that fall flat within an hour, frizz that appears out of nowhere, or that awkward, too-stiff ringlet look that screams “amateur hour. ” But here’s the thing: creating truly stunning curls at home isn’t some mystical skill reserved for professionals with years of training. It’s a matter of understanding a few key principles and following a methodical approach that works with your hair’s natural texture.
Step One: Prepare Your Hair with Proper Washing and Conditioning
Your curl journey doesn’t start with the styling iron, it starts in the shower. Think of it this way: trying to curl unprepared hair is like trying to paint a wall without priming it first. You might get some results, but they won’t last, and they certainly won’t look professional. Begin with a moisturizing shampoo that actually nourishes your hair rather than stripping away every bit of natural oil.
Step Two: Section Your Hair Strategically for Even Results
Want to know the number one rookie mistake when curling hair? Trying to work with massive chunks all at once, which inevitably leads to some sections looking perfect while others barely have any curl at all. Professional stylists never skip the sectioning step, and neither should you. Grab some clips or hair ties and divide your hair into at least four manageable quadrants, two in front, two in back. If you’ve got particularly thick or long hair, don’t hesitate to create six or even eight sections because working with smaller portions is infinitely easier than wrestling with too much at once.
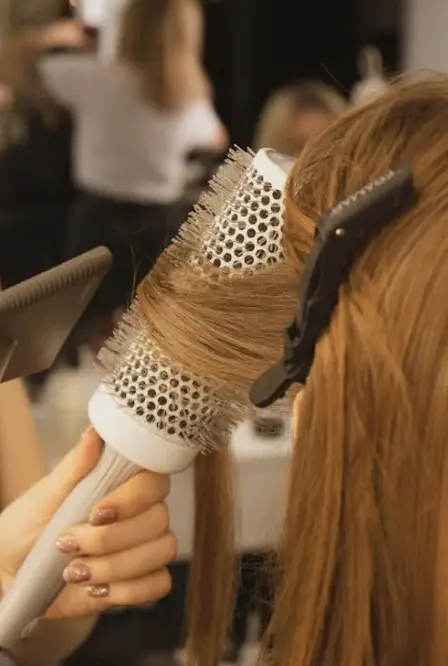
Step Three: Master the Curling Technique with Proper Tool Usage
Now we’re getting to the heart of the matter, the actual curling technique that separates salon-quality results from disappointing attempts. Always start with your bottom sections and work upward, which allows those gorgeous upper layers to cascade naturally over the lower ones for a cohesive, professional finish. Here’s where the tool angle becomes crucial: hold your curling iron vertically for those elegant spiral curls or horizontally for more traditional, rounded waves. Keep it pointed downward to avoid awkward angles near your scalp that can make your curls look weirdly bent.
Step Four: Perfect Your Curl Direction and Pattern
Creating truly natural-looking curls isn’t just about technique, it’s about understanding curl direction and adding intentional variation throughout your head. The sections that frame your face should always curl away from your face, which opens your features and creates a lifted, flattering look that draws attention to your eyes. For the rest of your head, here’s where you add dimension: alternate the direction of your curls, wrapping some sections forward and others backward. This variation keeps your curls from clumping together into those unfortunate solid blocks that scream “styled with a curling iron. ” Instead, you get movement and texture that looks organic, like you were just born with amazing hair. You can also play with sizing, slightly larger curls on the bottom layers and smaller curls on top create added volume and visual interest that flat, uniform curls never achieve. The crown area deserves special attention, especially for professionals who need to create salan curls with a 2 inch curling iron for maximum impact where volume matters most. For extra lift at your roots, hold your curling tool closer to vertical and direct it upward as you curl those crown sections. The back sections can be tricky since you can’t see what you’re doing very well, consider setting up a mirror so you can see behind your head, or better yet, ask a friend to help with those hard-to-reach areas. Remember, you’re not aiming for robotic perfection here. Slightly varied, imperfect curls look infinitely more natural and sophisticated than identical ringlets repeated all over your head.
Step Five: Set and Style Your Curls for Long-Lasting Hold
You’ve just finished curling your last section, and your fingers are itching to run through those beautiful curls immediately. Don’t do it! This is where patience becomes your best friend. Allow your curls to cool completely for at least ten to fifteen minutes, this cooling time gives them the opportunity to fully set in their new shape, which is what makes them last for hours instead of falling out immediately. During this waiting period, you can gently clip the roots of your top sections to boost volume, or pin any overly bouncy curls flat against your head if you want them to relax into softer waves.
Maintaining Your Curls Throughout the Day and Beyond
Getting amazing curls is one thing, keeping them looking fresh all day is another challenge entirely. Your first rule? Stop touching your hair constantly. Every time you run your fingers through your curls, you’re transferring oils from your hands that weigh down the curl and cause it to lose bounce. If you absolutely need to refresh your curls midday, try this: lightly mist them with a mixture of water and a small amount of leave-in conditioner in a spray bottle, then scrunch gently to reactivate the curl pattern without disturbing the overall shape.
Conclusion
Creating salon-quality curls at home isn’t some impossible dream, it’s a completely achievable goal when you follow these five comprehensive steps with patience and practice. Success comes down to proper preparation that starts in the shower, strategic sectioning that ensures even results, mastering the actual curling technique, creating natural variation in your curl patterns, and finishing with the right products for lasting hold. Keep in mind that your first few attempts might not be Instagram-perfect, and that’s completely normal. Even professional stylists spent years developing their techniques and learning what works best for different hair types.
Also READ